Showing posts with label DIY. Show all posts

Thursday, June 27, 2013

Eloise's House

I spy a happy little girl in her new house!

We bought a house today for Eloise: a 6 '6 x 4 '4 playhouse for the backyard! It has a little door, four windows and a front porch, enough space inside for her play kitchen, a table and chairs and maybe even a couch. It's going to be the most adorable little space for her to play with friends.

When I was young my friend Kelly had the best playhouse ever. From what I remember - though this could very well be my own imagination - it was yellow with window boxes full of flowers, carpeted floors and all the necessities for caring for our baby dolls. We played in there for hours.

Since I never had a playhouse (we had a very awesome tree fort) the vision I have for Eloise's new house may be a manifestation of my own childhood fantasy. I also love any opportunity for a Craigslist find-turned-DIY. With this in mind, I've got big plans for this little house. First, I want to paint the outside to match our house and outfit the windows with plexiglass to keep rain and critters out. Inside I'd like to use leftover linoleum that lives in our attic to cover the floors and paint the interior walls. The house will definitely need a window box or two, some Adirondacks for sunny days and perhaps a battery-powered porch light. I imagine Eloise and her friends hosting tea parties, playing pretend and when they're old enough, maybe even camping out. Can you tell I'm excited?

But first, we have to figure out how we're going to even get the playhouse into our yard. We have no opening large enough to simply move the house in so it's going to require some brainpower and braun to figure this out. But these are the small details, right? I'm ready to decorate!

Wednesday, January 2, 2013

Eloise's Little Kitchen


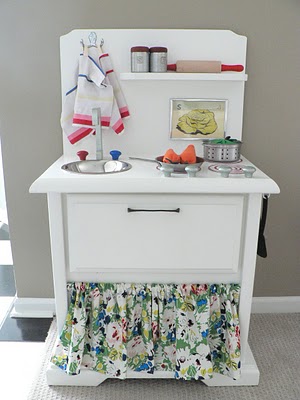
A DIY play kitchen has been on my mind for a long time. The huge plastic monsters at big box stores just don't do it for me and I have always preferred the idea of repurposing an old piece of furniture into a little kitchen of my own making. I was lucky to come across a very inexpensive bedside table ($9!!) and with assistance from my parents - we're a crafty bunch - Eloise's play kitchen came to life, just in time for Christmas morning.

Here is what I started with, a 21.5" tall x 13.5" wide x 16.5" deep sad looking bedside table from the Salvation Army. It also had that classic 'thrift shop' smell. What is that anyway?


To get started I removed the hardware and marked out where the holes for the sink and oven door glass were to be. My Dad cut the holes and then I sanded and patched any holes with wood filler.

By this time the kitchen was starting to look much less like a bedside table. With just a few days to go before Christmas I finally got around to priming.


And finally, it was time to paint. I used leftover paint from our turquoise sideboard, which itself was a freebie. Two coats of paint, et voila!

Such a fabulous colour.

Next it was time for details. I used epoxy to adhere a piece of tinted plexiglass (cut to size at the hardware store) for the oven glass and a stainless steel bowl (only $0.49 at the Salvation Army) for the sink and let both dry over night. My dad helped me with the next parts which involved cutting a hole for the faucet and attaching 'hot/cold' handles with nuts and washers so they would spin. The faucet and handles themselves were literally found objects and I adore the brassy patina all three developed from being left out in the elements for some time.


The finishing touches involved sewing a little curtain using leftover fabric and feeding it onto a mini-compression rod saved from the Nook. The oven drawer handle and utensil storage rod are made from IKEA hardware and the hanging crock is from IKEA too. I painted on the stove burners with leftover grey paint from our fireplace and I created the coils by tracing any round items I could find with a sharpie. Very technical.


The stove knobs are some of the original hardware from the sideboard in our living room and I painted on temperature controls with red nail polish. A piece of MDF was glued into place where the bottom drawer used to be and it now serves as storage for extra cookware and play food. Last but not least, a press on LED light is glued inside the oven so Eloise can turn the light 'on' when she wants to check her baking and a retro timer my Mom found at Chapters let's her know when things are done. The 'ding' always makes her giggle.

Much of this project was put together using items we already had around the house and the few things that were purchased were not very expensive. More than anything, this project was a collaboration. I could not have created this kitchen without contributions from my Mom & Dad, cousin Anthony and girlfriend Aliy who made the most amazing coordinating apron and oven mitts which Eloise loving refers to as puppets. You all helped make a little girl's present really special!


Friday, December 21, 2012

Prime Time

You know what I realized this morning? Christmas is in just four days and I have not even primed Eloise's play kitchen. I've been putting it off with everything else going on (plus I hate painting), but you know what? There is just not enough time anymore. If Eloise is going to have her special present to play with on Christmas morning then it's prime time.

Chris took Eloise to Victoria yesterday to see family (I sadly couldn't go because of work) and as much as I miss them, their absence is giving me precious time to actually complete this project and the rest of my Christmas prep. I'm rocking out an all hip hop playlist and getting my paint on.

This is what the night stand looked like when I brought it home:


Then after my Dad cut out a hole for the sink and oven door and I sanded it:


And now, we prime.

Friday, December 7, 2012

Salt Dough Ornaments

Remember making salt dough ornaments in preschool? I do. My mom still hangs them on our Christmas tree.

I thought salt dough would be an easy Christmas craft to do with Eloise so I found a recipe online and invited our friends Ashleigh & Sawyer over with the idea of doing hand prints of the kids to hang on the tree. Except Eloise would not put her hand in the dough ... "No, 's sticky!" she said.

Since Eloise wasn't in the crafting mood I used some cookie cutters and made a bunch of holly leaves, bells, trees and two random rhinos for the tree. Or maybe for gift tags.

Salt Dough

1/2 cup table salt
1 cup all purpose flour
1/2 cup warm water

Combine all ingredients mix for 5-8 minutes, until the dough has formed and is no longer sticky. Roll dough onto a floured surface, 1/4 inch thick. You'll need lots of flour for rolling. Once cut into desired shapes, bake ornaments at 200 degrees for 4 hours or until dry. I know this sounds like a long time but you want to bake them this long to avoid bubbles in the dough.

Before cutting out shapes I made a pattern on the rolled dough with a Christmas script stamp. My mom has an extensive collection of cookie cutters so I was able to sample from her stash, but you could even use a glass for a simple circle. Use a straw on skewer to make a hole for hanging.


This is one of my almost-finished ornaments. Pretty right? For the finishing touch I'm going to add some gold leaf.

Thursday, November 15, 2012

40 Days


40 days. That's how many there are until Christmas, so said a sign welcoming me to the grocery store today. There are Christmas decorations on the shelves, Christmas music over the PA and apparently, just over a month to go before the 'big day'. How did this happen? I've just recovered from Halloween.

For the last few years we have been drawing names and following this rhyme for family gift giving:

"Something to wear, something to read, something you want and something you need."

Every person draws a 'wear', 'read', 'want' and 'need' for another member of the family so that they are buying just one gift in each category. This method of gift giving has worked beautifully for us and I look forward to continuing the tradition with Eloise.

Speaking of Eloise, I've got big plans for her Christmas present. This year she will be getting a play kitchen from Santa which I will be making using a bedside table; it's going to have a sink with a faucet, a stovetop, and an oven with a light. I've been looking forward to creating a special play kitchen since before Eloise was born, so I can hardly wait to get started on this project.

Check out my super score from the Salvation Army Thrift Shop yesterday for $9.


She's a little homely at the moment but I've engaged my dad to help with the cutting (you really don't want me around power tools) and I'll be converting this sad looking piece of furniture into a darling kitchen for Eloise.

Here are some of the DIY play kitchens that I've been looking to for inspiration:

{pinterest}
{young house love}
{pinterest}

Sunday, November 11, 2012

Strengths & Weaknesses


Last night my girlfriend Aliy came over for dinner and installed a dimmer switch for our dining room fixture. Amazing right? She is one of those people who seems to be good at everything (and know everything, her internal encyclopedia is incredible) and it got me thinking about strengths and weaknesses.

I am an excellent multitasker (why just brush your teeth when you can make the bed and get dressed at the same time?), I'm good at sewing and crafts and I am downright excellent at organizing. It's definitely not my favourite thing, but I have always been very good at cleaning too.

But I am a terrible painter. I get paint on the floor and one time I accidentally painted over an electrical outlet (Aliy saved the day by installing a new one, of course). I cannot cut hair, which is why my bangs are slightly crooked, and I can't throw a ball to save my life so I never played sports. I always mix up my rights and lefts and don't know how to properly make a pot of coffee. Math makes my head spin and I can't keep plants alive - once I killed a hearty ficus in a matter of weeks.

The beauty of knowing your strengths and weaknesses is being able to build a network of people who can do the things you cannot. I am so thankful to have friends who can build things and teach me about sports, a Mom who imparts her wisdom and a husband who makes the best cup of coffee ever.


Friday, September 21, 2012

Dining Nook

The banquette is in place Chris and I couldn't be happier with our new dining nook. We were able to host a few more dinners over the summer thanks to the newfound space and Chris has taken over the dining nook as a comfortable place to study for the Diploma program he recently started.


I've finalized our pillow selection and really could not be more pleased with how well this project turned out. We found the three mustard yellow toss pillows at HomeSense and I made the other three with fabric from Chintz and inserts from IKEA. Chris has actually asked for more toss pillows and like any woman, I could not be more willing to oblige. Is this a cue to add a few more to the bed too?


Wednesday, September 19, 2012

Eloise's Room

It's been a while since I mentioned the Nook or even thought about it, but my friend Jen came across an article on Babble about "Making it Work With No Nursery" and our little Nook was not only featured, it was the feature photo! I can't help but feel proud that the Nook is an inspiration to others faced with small spaces and a baby on the way. Our successful closet conversion just goes to show that a little hard work and some outside-the-box thinking can make any space usable.

The Nook on Babble.

I posted photos of Eloise's room a while back, but since then I have added much more pink so I thought it fitting to do an update. Her bedroom is certainly larger than the Nook (which was literally 10 square feet!), but at 9 x 11' it definitely isn't a big space.

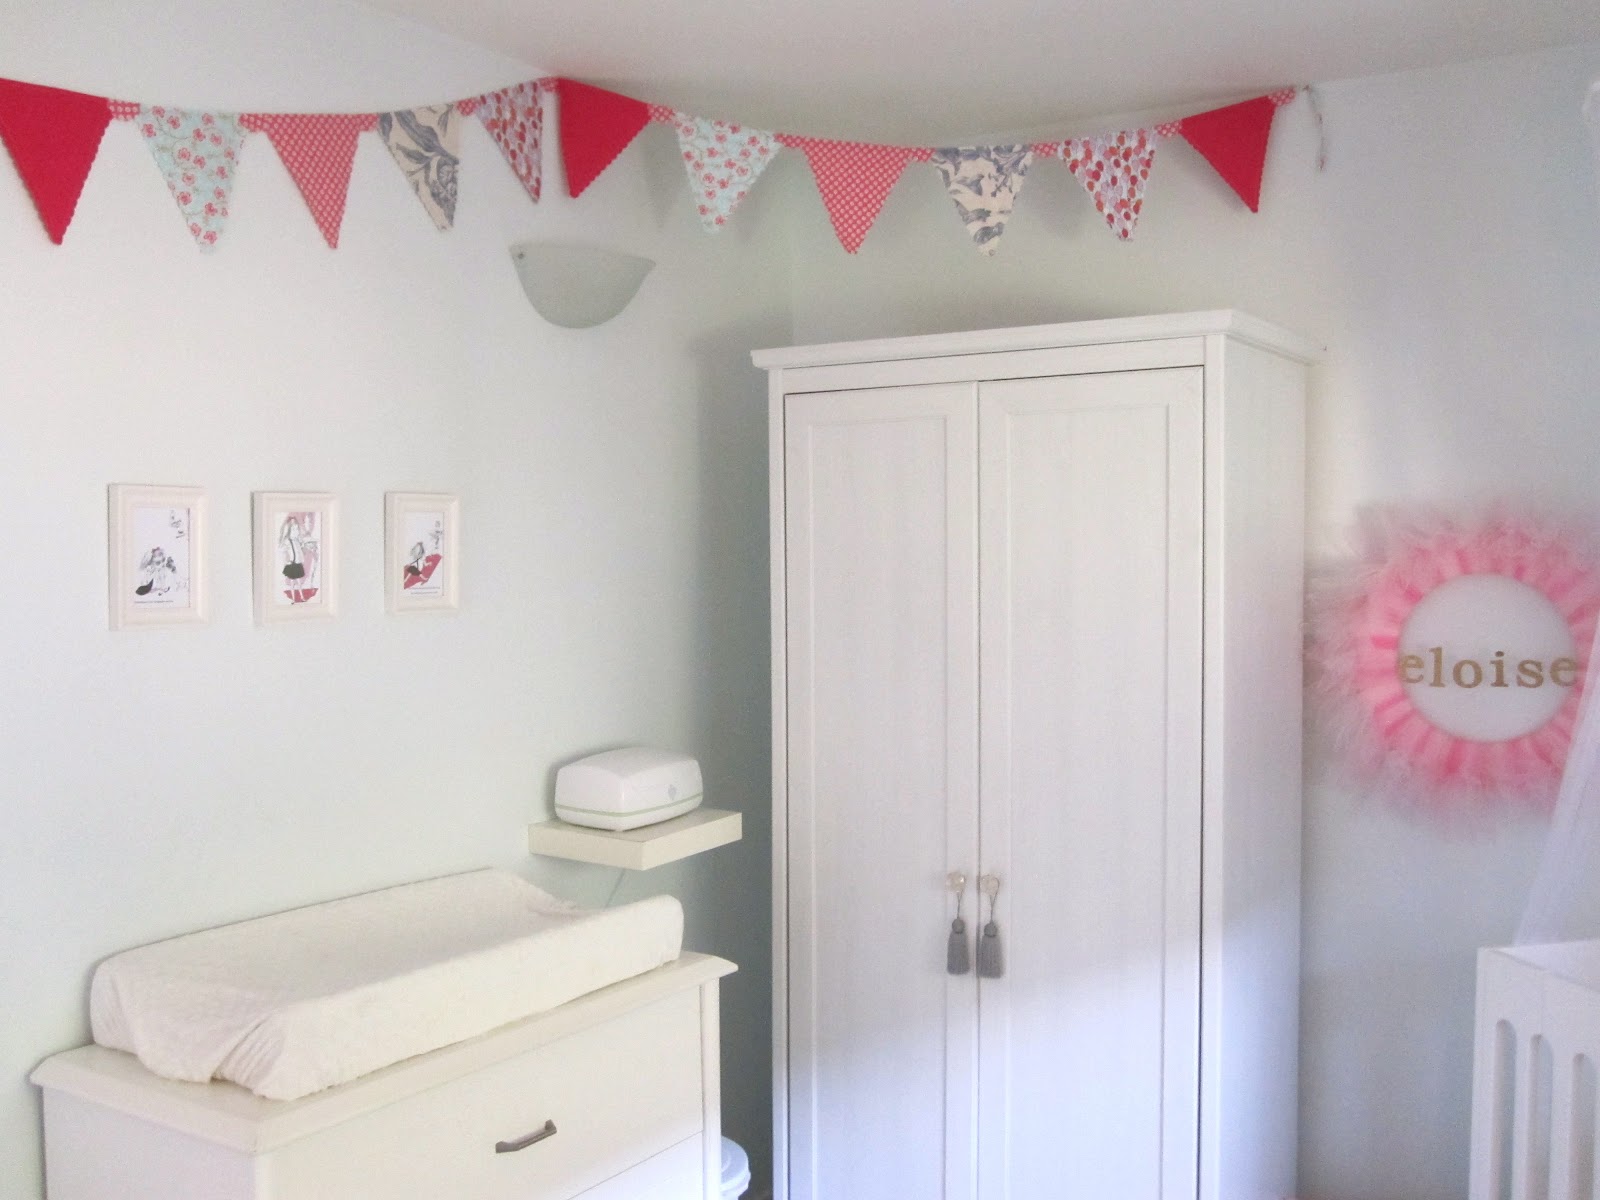
Eloise's room has pale, robin's egg blue walls and lots of airy touches that make it feminine and pretty. This Spring I made the bunting to give the room more colour and dressed up the mosquito net above her crib with lace. The 'Eloise' tutu wreath was a pinterest project from her birthday party and the artwork around the room is all made by me; a silhouette of Eloise at one year, a shadow box of one of her preemie sleepers, a watercolour from my university days and a french alphabet print created by framing a piece of wrapping paper from The Cross.

The only piece of new furniture in Eloise's room is her Alma Mini crib by Bloom. Everything else has been reused, repurposed or purchased second hand, proving that a beautiful nursery on a budget is not only possible but very pretty.


Saturday, June 30, 2012

DIY Banquette

Our dining area is a challenge. The space is very awkward and doesn't really fit our table and chairs, so to utilize the space better Chris and I wanted a banquette along the back wall for additional seating. We have an IKEA Lack shelving unit (now sadly discontinued but similar here) which was being poorly used in our bedroom closet, so I pulled it out, turned it horizontally and built it up to make it a banquette.

With my Dad's help, the bench was raised up a few inches on five, 2 x 4s cut the width of the unit and topped with plywood. I purchased some 1.5" high density foam, custom cut at my local Foam Shop, to top the plywood, wrapped it in batting and finally covered the plywood with a stunning ikat fabric from Chintz.


Love my stapler.

Almost done.
Ta da!

The result is quite fabulous (if I do say so myself) and the whole project took only a few hours of work. We're still finalizing our pillow choices - Chris actually suggested that we need LOTS of pillows - but this is the fun part.

Check out these other gorgeous benches made with IKEA's Lack.

{martha stewart}

{daffodil design}


Monday, January 17, 2011

The Perfect Kitchen

Not too big, not too small, this is the most perfect kitchen I have ever seen...

Love, love, love this play kitchen by The Crafting Chicks

The most perfect play kitchen, that is! Robin's egg blue, crystal knobs, shabby chic textiles AND pom poms? I think I'm in love. I came across this beautiful kitchen on The Crafting Chicks and I cannot wait for an opportunity to make one like it. Nevermind that our baby's due date is still two and half months away, I can't help myself from daydreaming about crafting a cute play kitchen in the not-so-so-distant future (step one: have baby). In the meantime, check out the Crafting Chicks how-to here to find out how they made it.


How sweet is this kitchen by Blue Eyed Yonder?

I also adore the play kitchens created by Blue Eyed Yonder, a blogger from Atlanta. The super cute Blue Eyed Yonder {little kitchens} are made by hand and you can purchase their kitchens, like the lovely "Lucy" above, on Etsy.

A little gem of a kitchen by Vintage Songbird

And last, but not certainly not least, I love this play kitchen from Vintage Songbird. In fact, I'd like to credit this cutie with my teeny tiny kitchen obsession since reading their how-to blog post about a year ago (no word of a lie, it's been saved in my bookmarks ever since!). A much more apartment-friendly profile than the other two kitchens, you can't even tell that this oh-so-adorable play kitchen was made from a re-purposed thrift store bedside table. Cute, smart AND thrifty? Now that's my kind of kitchen!