Showing posts with label projects. Show all posts

Friday, April 25, 2014

A Girls Gotta Twirl


The twirly dress saga is finally over.

My mom's idea for homemade twirly dresses that is so good I think we're going to need to start taking orders. Working with an inexpensive t-shirt for the bodice and a cotton fabric cut into a circle skirt, my Mom's design connects the two pieces at the waist with a serger and finishes the hem with a serged rolled edge. Her prototype was an immediate hit with our twirly girl so we of course sought our more tees and made a trip to the very fabulous Spool of Thread for some really gorgeous cottons.


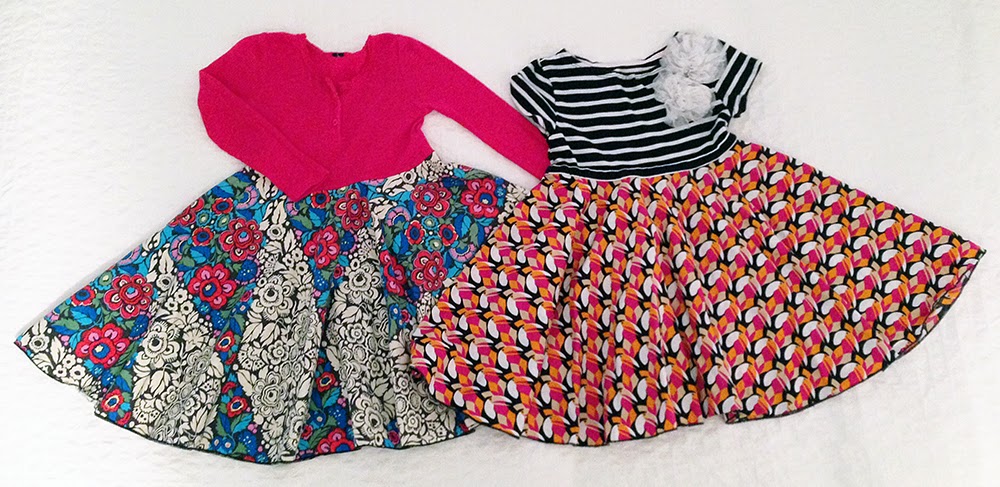
The best part is these twirly dresses can be whatever you want and putting them together is quite a quick and simple process (right Mom?). We used a few tees found on the sale rack at the Gap and another from Joe, mixed patterns and colours and voila! Eloise now has four dresses to twirl to her heart's content. The ones above are my personal favourites but Eloise doesn't discriminate, she loves them all. 

Eloise is so smitten with her new dresses that she's been asking to wear them to bed, with tights. So long as they're clean it's fine with me. Now all we have to do in the morning is add clean panties and a cardigan and we have a solution to getting Eloise dressed everyday without a fuss. Thanks, Gaga.


Wednesday, April 9, 2014

Polka Dotty, Realized


Our room for two is finally finished and it's lovely.

Eloise's room, which she will soon share with her new sibling, has been cleared of clutter, cleaned top to bottom, reorganized and redecorated. With the exception of Eloise's bed everything moved around and we now have the room set so that both kids will have their own 'space' (aka sides).

My original vision was for a gender neutral black, white and pale blue room sprinkled with lots of polka dots and I'm quite pleased with how it all came together. I also decided to add in black and cream toile since, why not, and I used toile fabric to make Eloise a new duvet cover and recover a stool. I made a gallery wall above the Expedit (excuse me, Kallax) which holds books and toys in pretty canvas bins, put up a few polka dot pom-poms and am in love with my "piece de resistance", the polka dot wall. At first I thought the polka dots should all be measured out and perfect but then I just decided to wing it and am happy I did. The installation took me all of 20 minutes and the result is GORG. You have to check out Polka Dot Wall Stickers on Etsy, they were inexpensive and work just beautifully (we also used these decals on lampshades for our Kate Spade inspired installation).

The turquoise IKEA Raskog cart is perfect as a diaper caddy and I can't wait to put my new wipes warmer into service (a wipes warmer is seriously my favourite baby gadget). We've stocked up on the cutest newborn diapers from The Honest Company to get us through the first few weeks of poop explosions and all of our Kissaluvs and Bummis covers are washed and ready for use. New soothers have been sterilized, bottles & pump are prepped and baby clothing is washed. We. Are. Ready.


Thursday, April 3, 2014

Shower Power

All it took was a $70 shower head and we're back to a pleasant bath time routine. Chris and I have been meaning to purchase a new shower head for a while now, maybe even since E was a babe, as having the option of a detachable shower head makes bathing little ones so much easier. It also makes cleaning the shower easier and it's no secret that I like my bathrooms sparkly clean. 

The new shower head has a stationary rain head and a detachable wand that fits inside when not in use. It's not a fancy fixture by any means but it works well and Eloise is so excited about being able to control the wand herself that she doesn't seem to notice the drain. Since Chris installed the shower head last week we've gotten bath time - or rather shower time - down to a quick 10-minute process. Clean hair, clean kid and no arguing, who knew it was the power of the shower that would get us here. 

Monday, March 31, 2014

Baby Prep

I'm a big list maker. Spelling everything out on paper helps me to see exactly what needs to be done and I do this pretty much daily in my personal and professional life in order to organize my time. Before Baby Two arrives we have been chipping away at our Baby Prep list. It's a long one, and though there are a number of items listed that seemingly have no relation to baby, I have a sneaking suspicion that if they aren't completed now it's going to be a long time before we get to them again. 


Thankfully more time at home means that we've slowly been checking things off. While my dad and Chris tackled the garage a few weekends ago I finally reorganized Eloise & Baby's closet, moved un-needed furniture out of their bedroom, sorted and organized my crafts and even made some much needed changes to my Monica Closet. I've filled holes in walls, primed and painted, assisted Chris to install a pretty new curtain rod and drapes in our bedroom and am just about to whip up a new bed skirt for us and a duvet cover for Eloise. This coming weekend we'll hopefully finish prepping Eloise's room for Baby by bringing down the crib, de-pinkifying and putting up a gallery wall.

It's all coming together and the best part is, we're only five items away from a fully checked off list. 

Monday, March 10, 2014

My Monica Closet

Remember that episode of Friends where Chandler breaks into Monica's secret closet to discover the the reason it's locked is because it is jammed with crap, muddying Monica's obsessively neat sensibilities? I'm sad to admit I'm having a similar problem.

I am a clean freak and hate clutter, so the fact that we have a 3.5' x 5.5' storage closet is a huge bonus. We use this space as our pantry and though it currently holds dry goods and serving trays like a pantry should, it is also a dumping ground due to lack of function. With a full size, inward swinging door, nearly half of the space is unusable and I have taken to stashing anything and everything behind the door just so I don't have to look at it. It's not great.

As I'm sure you can guess, my own 'Monica' closet is on my list of projects to tackle before baby. I want to switch out the ridiculous full-size door for a simple bifold or sliding barn door and add more shelving and lighting to revamp the space. Once our pantry is truly functional, perhaps even pretty (well organized canned goods can be a beautiful thing), then maybe I won't be shoving stacks of un-sorted papers, odd craft supplies and and assorted baby gear and tightly closing the door.


Sunday, January 5, 2014

To Dos for a New Year

It's been a very productive couple of days around here, what a way to kick off the new year.

Let's start in the kitchen. For Christmas we received a gorgeous mirrored floating shelf from West Elm (the one on my list!). Unfortunately it did not fit with our wall studs and would be too heavy for wall plugs, so it had to go back. After perusing West Elm for alternatives we opted for their silver branch shelf brackets. We'll top the brackets with a pale piece marble for a look much like this shelf from West Elm, just longer to accommodate more glassware. 

The next kitchen project is the completion of mudding and sanding the hood fan. Chris was adamant  about finishing this before he's back to work next week and I am pretty excited to see this drawn out project complete (it will be nice to look up in my kictchen and see paint rather than exposed drywall). My kitchen may look like a crime scene, we can't use our stove and Chris has been ingesting drywall dust for days with the endless cycle of mud, sand, wait, mud, sand, wait, but the process is always the worst part, right? 


Moving into the living room, we decided to reclaim our IKEA sofa bed from upstairs. When we moved into our house a few years ago we traded it up for a nicer, custom couch in caramel brown chenille but we've realized we missed having a place for guests to sleep over and I'm very over the colour brown. In fact, save for the brown of wood or a good handbag, I want to eliminate brown from my life. I'll add that to my New Years resolutions: Find balance! Banish brown!

So, out with the brown and in with Ektorp. We replaced our old white cover with a new twill cover in a greyed beige that just happened to be on sale. It is perfection with our wall colour and the light couch makes such a difference to the feel of the whole room. I'm a happy camper.

Still a little wrinkled, but I'm okay with that.

Next up in the living room (which is basically our foyer, and also my office...) we finally bought a new desk chair. We chose the saddle desk chair I've been lusting after at West Elm and I am much happier sitting for hours while I work. Plus, it's really pretty.

{west elm}

And finally, our bedroom closet. Yes, we decided to tackle this too before Chris returns to work so we spent several hours in IKEA working out a closet system that would work for our limited space. Based on my research, the price and quality of IKEA's Algot system can't be beat, so this is what we ended up going with. Thanks to interchangeable pieces we were able to customize a configuration to fit our needs and our new bedroom closet, including wood supports to screw the closet brackets into, cost us less than $400. 


And will you look at that?! So we have no closet doors, my dresses are homeless and my shoes still live in three different spots, so what. The hustle Chris and my Dad put in yesterday to give me a functional closet got us one step closer to making room for Baby 2.

Just don't tell Eloise that I will be taking back a quarter of her closet after all...

Thursday, June 27, 2013

Eloise's House

I spy a happy little girl in her new house!

We bought a house today for Eloise: a 6 '6 x 4 '4 playhouse for the backyard! It has a little door, four windows and a front porch, enough space inside for her play kitchen, a table and chairs and maybe even a couch. It's going to be the most adorable little space for her to play with friends.

When I was young my friend Kelly had the best playhouse ever. From what I remember - though this could very well be my own imagination - it was yellow with window boxes full of flowers, carpeted floors and all the necessities for caring for our baby dolls. We played in there for hours.

Since I never had a playhouse (we had a very awesome tree fort) the vision I have for Eloise's new house may be a manifestation of my own childhood fantasy. I also love any opportunity for a Craigslist find-turned-DIY. With this in mind, I've got big plans for this little house. First, I want to paint the outside to match our house and outfit the windows with plexiglass to keep rain and critters out. Inside I'd like to use leftover linoleum that lives in our attic to cover the floors and paint the interior walls. The house will definitely need a window box or two, some Adirondacks for sunny days and perhaps a battery-powered porch light. I imagine Eloise and her friends hosting tea parties, playing pretend and when they're old enough, maybe even camping out. Can you tell I'm excited?

But first, we have to figure out how we're going to even get the playhouse into our yard. We have no opening large enough to simply move the house in so it's going to require some brainpower and braun to figure this out. But these are the small details, right? I'm ready to decorate!

Monday, June 10, 2013

In Defense of IKEA

Chris keeps suggesting that it's time to break up with IKEA but I just can't manage to cut it out of my life. The catalogs get me every damn time with their styling, creative use of vertical space and incredibly reasonable prices. I mean, who can argue with $0.49 cotton muslin tea towels?

I agree with Chris that a house full of IKEA screams "university living", but when mixed with higher quality, classic pieces no one will ever know that the shelf in your living room was assembled in 15 minutes with nothing more than an Allen key. You also can't compete with IKEA for storage pieces, bath towels, fun linens, frames and candles. That frame department is off the hook.

There are two reasons that I am thinking about IKEA right now. The first is that I need to do something about the toy storage in Eloise's room immediately. And by something, I mean corral, it's a disaster. Since I don't want to spend more than $50 I figured the EXPEDIT would be a good pick and I had an 'aha' moment when I realized the top looked to be just about the right size for a change table pad (it is). Once Eloise has a sibling to share her room with I can simply add legs for a double duty toy and change station. Perfect.

{ikea}

I really love these rugby stripe fabric bins from The Container Store for toy storage. They're the just right size for the EXPEDIT cubes, have rope handles for easy access and even ship to Canada. Unfortunately they wanted to charge me $45 for shipping. Well it looks like I don't like these bins that much.

{the container store}

This monogrammable (!) felt storage bin from West Elm is pretty cool too.

{west elm}

I also like the idea of a simple wire basket so that Eloise can see where her toys are and learn to put them back in the right spot. My Mom suggested toys may just fall through, so maybe not a great choice for small parts.

{crate&barrel}

The other reason I have IKEA on the brain is that I am totally obsessed with the idea of open shelving in the kitchen. Chris and my mom both tried to persuade me to install shelves when our kitchen was renovated two years ago but I resisted. I wanted nothing but art on the walls. Now I am positive it has to be done and honestly, I can't think of anywhere else besides IKEA you can you buy floating shelving? A look at the images below and I'd guess that all three projects used IKEA LACK wall shelves.

{pinterest}
{pinterest}
{pinterest}


Tuesday, April 2, 2013

The Easter Buddy

It would be pretty weak of me to feign craft exhaustion still from Eloise's birthday, so I'll just call it like it is: I just could not get into Easter.

The weather this weekend was spectacular; it's weekends like this that make us forget it rains in Vancouver more than half of the year. Recent Easter weekends have been dreary and wet, but this one was all blue skies and sun, sun, sun. I had plans to make some yummy Easter treats for my little bunny, producing a spectacular egg hunt on Sunday in which she would fill a beautiful pink and gold, egg shaped Easter basket, dressed in an Easter dress and bunny ears. Instead I sent Chris off to Purdy's late Saturday and we finally got it together for an Easter egg hunt at four o'clock on Monday. The Easter basket I had in mind is missing, likely buried beneath tubs of Christmas decor, so Eloise collected eggs in a tupperware we had on hand and wore the leggings she took her nap in. Chris did plant an Easter bunny figurine in the garden which Eloise found and exclaimed, "the Easter Buddy!" and had an excellent time collecting eggs amongst the flowers, so all was not lost. I'll try again next year.


Uninspired Easter plans aside, it was a productive weekend. I read a book and a half in the sun and Eloise alternated between playing with the hose in the back yard, swinging in front yard and going to our nearby park. Meanwhile, Chris and my dad dug up the mess of moss and weeds next to our garage and replaced it with a lovely path of pavers and soft round rocks. The finishing touch will be a few trough style planters filled with something pretty. A much nicer sight to gaze at from our front door, don't you think?


How did you spend your Easter weekend?

Sunday, February 10, 2013

Vintage Circus

I've done quite a bit of prep for Eloise's Circus party this weekend and while designing her invitations I came across these charming vintage circus animals on a site called The Graphics Fairy which is an absolute goldmine for images to use in craft and DIY projects. I'll be bookmarking this one for sure.


{the graphics fairy}

Just wait til you see the invitations I did!

Friday, February 1, 2013

Circus Circus


It's hard to believe but Eloise's second birthday is just around the corner. Of course I've been dreaming of plans for this party since shortly after her first, but now it's time to really start planning. As we enter what is sure to be an exciting and challenging year in Eloise's toddlerhood, otherwise known as the 'terrible twos' this year's birthday theme is going to be, appropriately, The Circus.

I took my inspiration for this party from a set of tin circus plates from Restoration Hardware given to us by Eloise's cousin Lucy. I just love the colours and Eloise is crazy about all of the animal images: a giraffe, monkey, elephant, and goose. There are even little tin circus animals which will hold her birthday candles.

Using these plates as a starting off point I'm thinking lots of red & white with animal motifs throughout, perfect fun for Eloise and her friends. I've been getting tons of inspiration from Pinterest and have a few other ideas up my sleeve (just like a magician, pun intended). Lots of balloons, a 'big top' in the dining room, maybe even a juggling not-scary clown, it's going to be way too much fun.


 {1} {2} {3} {4}


Wednesday, January 30, 2013

Dumpster Diving

It turns out my lane is a gold mine. A few days ago I noticed a rather unusual round, metal chair. I ignored my initial impulse to pick it up but by Monday I just couldn't resist. Chris was not as enamored by my find, especially not when I stated it would live in the garden. Regardless, I think it is a totally fab, modern find and it's going to be dynamite painted mint green or tangerine. A perfect spot to relax with a cold drink on a hot summers day (oh, that seems so, so far away...)

Thursday, January 24, 2013

Work in Progress

Big Girl room work in progress.

Eloise has not yet figured out how to get out of her big girl bed, and thank goodness. She can climb in by herself and happily plays in her bed throughout the day, but when she wants out she calls for me. I plan to keep it this way for as long as possible.

First time in our trying bedtime experience over the last year I am actually the one who manages to get Eloise to sleep in under an hour. I've got naptime down to a 15 minute process and if I do bedtime it takes me around 30. Unfortunately, the only way to get her to sleep is to lie down in bed with her. I know, slippery slope. But here's the thing, if lying down with Eloise gets her to sleep quickly and without any tears, then what is the harm? I figure in about 12 years she's going to want nothing to do with me so I'll take all the snuggles I can get.

The biggest issue we've had with Eloise's transition to her big girl bed is that she's started waking up in the middle of the night again. We've tried to just leave her cry but when she calls for us over and over saying "scared" (or starts doing the dreaded cry-cough) we can't just leave her. Chris and I have alternated between sleeping in her bed but last night I remembered to turn on the nightlight and she slept for a solid 11 hours. Why did it take me so long to figure this out?

Her new room is still very much thrown together. We haven't picked out her linens or hung things properly on the walls and come spring her bed will be getting a very lovely coat of pink paint. Still, she loves her very own Big Bed and although getting her to sleep is still a work in progress (but isn't it always?), this transition was the right choice.

Wednesday, January 2, 2013

Eloise's Little Kitchen


A DIY play kitchen has been on my mind for a long time. The huge plastic monsters at big box stores just don't do it for me and I have always preferred the idea of repurposing an old piece of furniture into a little kitchen of my own making. I was lucky to come across a very inexpensive bedside table ($9!!) and with assistance from my parents - we're a crafty bunch - Eloise's play kitchen came to life, just in time for Christmas morning.

Here is what I started with, a 21.5" tall x 13.5" wide x 16.5" deep sad looking bedside table from the Salvation Army. It also had that classic 'thrift shop' smell. What is that anyway?


To get started I removed the hardware and marked out where the holes for the sink and oven door glass were to be. My Dad cut the holes and then I sanded and patched any holes with wood filler.

By this time the kitchen was starting to look much less like a bedside table. With just a few days to go before Christmas I finally got around to priming.


And finally, it was time to paint. I used leftover paint from our turquoise sideboard, which itself was a freebie. Two coats of paint, et voila!

Such a fabulous colour.

Next it was time for details. I used epoxy to adhere a piece of tinted plexiglass (cut to size at the hardware store) for the oven glass and a stainless steel bowl (only $0.49 at the Salvation Army) for the sink and let both dry over night. My dad helped me with the next parts which involved cutting a hole for the faucet and attaching 'hot/cold' handles with nuts and washers so they would spin. The faucet and handles themselves were literally found objects and I adore the brassy patina all three developed from being left out in the elements for some time.


The finishing touches involved sewing a little curtain using leftover fabric and feeding it onto a mini-compression rod saved from the Nook. The oven drawer handle and utensil storage rod are made from IKEA hardware and the hanging crock is from IKEA too. I painted on the stove burners with leftover grey paint from our fireplace and I created the coils by tracing any round items I could find with a sharpie. Very technical.


The stove knobs are some of the original hardware from the sideboard in our living room and I painted on temperature controls with red nail polish. A piece of MDF was glued into place where the bottom drawer used to be and it now serves as storage for extra cookware and play food. Last but not least, a press on LED light is glued inside the oven so Eloise can turn the light 'on' when she wants to check her baking and a retro timer my Mom found at Chapters let's her know when things are done. The 'ding' always makes her giggle.

Much of this project was put together using items we already had around the house and the few things that were purchased were not very expensive. More than anything, this project was a collaboration. I could not have created this kitchen without contributions from my Mom & Dad, cousin Anthony and girlfriend Aliy who made the most amazing coordinating apron and oven mitts which Eloise loving refers to as puppets. You all helped make a little girl's present really special!


Friday, December 21, 2012

Prime Time

You know what I realized this morning? Christmas is in just four days and I have not even primed Eloise's play kitchen. I've been putting it off with everything else going on (plus I hate painting), but you know what? There is just not enough time anymore. If Eloise is going to have her special present to play with on Christmas morning then it's prime time.

Chris took Eloise to Victoria yesterday to see family (I sadly couldn't go because of work) and as much as I miss them, their absence is giving me precious time to actually complete this project and the rest of my Christmas prep. I'm rocking out an all hip hop playlist and getting my paint on.

This is what the night stand looked like when I brought it home:


Then after my Dad cut out a hole for the sink and oven door and I sanded it:


And now, we prime.

Tuesday, December 18, 2012

All That Glitters

I have a new affinity for the colour gold. It's pretty trendy in home decor right now and thanks to blogs like The Glitter Guide, Kate Spade and J.Crew and magazines like Matchbook, gold is certainly having a very pretty resurgence.

I wrote the other night about an amazing glitter deer head that my friend Marjorie made, well I had to make one for my own. This was such an easy project! I couldn't get my printer to print a deer head silhouette the size I wanted to I just free handed it, added the glue and lots of gold glitter. Looks like I AM putting my degree in advanced arts & crafts to good use after all!

not bad, right?
Here are a few other gold items I'm coveting ...

{dwell studio}
{j.crew}
{mitchell gold + bob williams}

{kate spade}
{anthropologie}

{design within reach}


All that glitters is gold!